Part 2: Custom app
Welcome to part 2 of this tutorial. Part 1 was mainly an introduction on how the basics of creating an app. Now we want to create a real GeoApps app with the use of the GeoApps UI-Framework. The UI-Framework contains multiple React components needed to create an app. Also check the following page on all the components in the UI-Framework: UI-Framwork. In this part we are going to use a couple of basic components in order to create our app.
You dont have to write LESS yourself. We have provided the following code for you to copy and pase into your main.less file:
.top {
    width: 100vw;
    background-color: #00b0ff;
    height: 100px;
    top: 0;
}

@logoUrl: url(@logo);
.logo {
    background-image: @logoUrl;
    height: 75px;
    width: 275px;
    left: 5%;
    top: 12.5px;
    position: absolute;
    background-size: 100%;
    display: flex;
}

body {
    overflow: hidden;
}

.column-left {
    width: 50%;
    left: 0;
    position: absolute;
}


.column-right {
    width: 50%;
    right: 0;
    position: absolute;
}

.button {
    top: 12.5px;
    height: 75px;
    font-weight: 700;
    font-size: large;

    &.next {
        background-color: rgb(0, 159, 223);
        position: absolute;
        width: 25%;
        right: 5%;
        border-top-right-radius: 25px;
        border-bottom-right-radius: 25px;
        text-align: center;

        &:hover {
            background-color: rgb(0, 134, 175);
        }
    }

    &.prev {
        background-color: rgb(237, 139, 0);
        position: absolute;
        width: 25%;
        left: 45%;
        text-align: center;
        border-top-left-radius: 25px;
        border-bottom-left-radius: 25px;

        &:hover {
            background-color: rgb(240, 147, 71);
        }
    }
}

.screenslot {
    position: absolute;
    bottom: 0;
    width: 100%;
    height: calc(~"100% - 100px");
}

.fullscreen {
    position: absolute;
    width: 95%;
    height: 90%;
    top: 5%;
    left: 2.5%;
    border: solid black;
}

.two-screens {
    overflow: hidden;
    display: flex;
    width: 100%;
    height: 100%;

    .two-left {
        flex: 1;
        width: 23.75%;
        border: solid;
        height: 90%;
        top: 5%;
        left: 2.5%;
        position: absolute;
    }

    .two-right {
        flex: 2;
        width: 68.75%;
        overflow: hidden;
        border: solid;
        height: 90%;
        top: 5%;
        right: 2.5%;
        position: absolute;
    }
}

.three-left {
    position: absolute;
    width: 30%;
    height: 90%;
    top: 5%;
    left: 2.5%;
    border: solid black;
}

.three-center {
    position: absolute;
    width: 30%;
    height: 90%;
    top: 5%;
    left: 35%;
    border: solid black;
}

.three-right {
    position: absolute;
    width: 30%;
    height: 90%;
    top: 5%;
    right: 2.5%;
    border: solid black;
}

.map {
    position: absolute;
    width: 100%;
    height: 500px;
    background-color: beige;
}
Note: When adding your own LESS to your app and you are using a calc(), the argument in the calc should always be in quotes and start with a tilde (~):
height: calc(~"100% - 100px")
Copy the following code and replace it with the code in your index.html:
<!DOCTYPE html>
<html lang="nl">
<head>
    <meta charset="UTF-8" />
    <meta name="viewport" content="width=device-width, initial-scale=1.0" />
    <meta http-equiv="X-UA-Compatible" content="ie=edge" />
    <title>Tutorial</title>

    <!-- Geoapps css -->
    <link rel="stylesheet" href="https://<tenant>/scripts/geoapps/v1/geoapps.min.css" type="text/css" />

    <!-- libraries -->
    <script defer src="https://<tenant>/scripts/geoapps/v1/geoapps.min.js"></script>

</head>

<body>
    <div id="root"></div>
</body>
</html>
Dont forget to fill in your tenants at the link and script tags.
Building our app
So far we have only use HTML and JavaScript. From this point on, we're going to add react to our app.
In your src folder, create a new file named index.tsx. Copy and paste the folowing code into this file.
import React from 'react'
import ReactDOM from 'react-dom'ß

const rootElement = document.getElementById("root");

const Main = () => {

};

ReactDOM.render(
    <Main />,
    rootElement,
);
This code is now the base of our app.
Copy the following line and paste it in your index.html, underneath <!-- libraries -->:
<script type="module" src="./src/index.tsx"></script>
Installing UI-Framework
In order to use components of the GeoApps UI-FrameWork, we need to install it first.
Add the following line in the terminal:
npm i @mapgear/geoapps-ui-framework
When the installation is done, it should appear in your package.json.
We advice to install the Visual Studio Code Extension for GeoApps to provide instellisense whenm modifying the manifest and configuration files related to GeoApps apps. You can find this extension here: https://marketplace.visualstudio.com/items?itemName=mapgear.geoapps-vscode
Importing GeoApps
To Authorize in GeoApps, we should first import the GeoApps component.
Import GeoApps from the UI-Framework and add in into your return statement:
import React from "react"
import ReactDOM from "react-dom"
import { GeoApps } from "@mapgear/geoapps-ui-framework";

const rootElement = document.getElementById("root");

const Main = () => {
    return (
        <GeoApps>

        </GeoApps>
    )
};

ReactDOM.render(
    <Main />,
    rootElement,
);
Building an app
An app contains the following parts:
- App: the app itself is the base of the presentation within the UI. The app can be packed in an app package, which can be imported within GeoApps;
- Screens: an app consists of one or more screens. When only a single representation is used, the app can have a single screen (like the GeoApps Viewer). If an app has multiple screens (like the MapTour), the user is allowed to add and remove screens from the app manager;
- Blocks: within every screen, slots (a type of placeholder) can be defined where user-configured information is added. This user-configured information are called blocks, and are also defined through the app manager. Samples of these blocks are text, image and map.
Note: Blocks are currently limited available within GeoApps. Within a future update, it is also possible to build and import blocks, in an identical way that apps are build.
In the next parts of this tutorial we are going to build an app with screens containing blocks.
Creating screens
First of, we are going to create a couple of screens. These screens are going to contain our content.
In the src-folder, create a new folder called screens. In this folder, create a new file called Screen1.tsx. Copy and paste the following code into this file:
import React from "react"
import { BlockSlot } from "@mapgear/geoapps-ui-framework";

export const Screen1 = () => {
    return (
        <div className="fullscreen">
            <BlockSlot slot={0}/>
        </div>
    )
};
The screen returns JSX. In the JSX we place a BlockSlot (the block we talked about earlier) from the UI-Framework. This BlockSlot is a placeholder which can contain user configured content. For example, this could be some text, an image or a map.
Extra screens
We want to add more screens with extra BlockSlots.
Create another two screens, the same way as we did before. Add 1 more BlockSlot in Screen2 and 2 more screens in Screen3:
import React from 'react'
import { BlockSlot } from "@mapgear/geoapps-ui-framework";

export const Screen2 = () => {
    return (
        <div className="two-screens">
            <div className="two-left">
                <BlockSlot slot={0} />
            </div>
            <div className="two-right">
                <BlockSlot slot={1} />
            </div>
        </div>
    )
};
import React from 'react'
import { BlockSlot } from "@mapgear/geoapps-ui-framework";

export const Screen3 = () => {
    return (
        <div>
            <div className="three-left">
                <BlockSlot slot={0} />
            </div>
            <div className="three-center">
                <BlockSlot slot={1} />
            </div>
            <div className="three-right">
                <BlockSlot slot={2} />
            </div>
        </div>
    )
};
Every BlockSlot in every screen should have its own slot number. BlockSlots from different screens can have the same slot numbers.
Creating the app lay-out
The next step is that we are going to create the lay-out of our app. This lay-out is going to show our screens and the other ui of our app.
In the src-folder, create a new file called AppLayout.tsx. Copy and paste the following code in this file:
import React from "react"
import { ScreenSlot, Next, Previous } from "@mapgear/geoapps-ui-framework";

export const AppLayout = () => {
    return (
        <div>
            <div className="top">
                <div className="column-left"></div>
                <div className="column-right">
                <Previous className="button prev">
                    Previous
                </Previous>
                <Next className="button next">
                    Next
                </Next>
                </div>
            </div>
            <div className="screenslot">
                <ScreenSlot />
            </div>
        </div>
    )
};
In this Layout component we have added a couple components from the UI-Framework. ScreenSlot is a component which can display our screens we have just added. The Next and Previous components can change the screen displayed by the ScreenSlot. When Next gets pressed, the next screen gets loaded into ScreenSlot. When Previous gets pressed, the previous screen gets loaded into ScreenSlot.
Combine components
Now we that we have created different components, we are going to join these together.
In your index.tsx import the following code:
import React from "react"
import ReactDOM from "react-dom"
import { GeoApps, App, ScreenTemplate } from "@mapgear/geoapps-ui-framework";
import { AppLayout } from "./AppLayout";
import { Screen1 } from "./screens/Screen1";
import { Screen2 } from "./screens/Screen2";
import { Screen3 } from "./screens/Screen3";

const rootElement = document.getElementById("root");

const Main = () => {
    return (
        <GeoApps>
            <App>
                <AppLayout />

                <ScreenTemplate type="SCREEN_1">
                    <Screen1 />
                </ScreenTemplate>

                <ScreenTemplate type="SCREEN_2">
                    <Screen2 />
                </ScreenTemplate>

                <ScreenTemplate type="SCREEN_3">
                    <Screen3 />
                </ScreenTemplate>
            </App>
        </GeoApps>
    )
};

ReactDOM.render(
    <Main />,
    rootElement,
);
Inside of GeoApps we have added the App component. This way, GeoApps knows this is an app. Inside App we place the AppLayout. To import our screens, we first need to import the ScreenTemplate component. Every ScreenTemplate contains a screen we have created and a type.
Expand manifest
In order to make our screens visible, we need to expand the manifest.
After the branding field in the manifest, add the following piece of code:
screens:
    - screen: SCREEN_1
      title: Screen 1
      description: This is screen 1
      order: 0
      settings:
        - key: TITLE
          title: Page title
          description: Title of the screen
          defaultValue: New screen
          fieldType: text
          required: true
      slots:
        - slot: 0
          title: BlockSlot
          defaultBlock: IMAGE
          allowedBlocks:
            - TEXT
            - IMAGE
We have added a new field called screens. In this field we can configure our screens. Every screens has a couple of important settings:
screen contains the TYPE as given in the ScreenTemplate. In this case, we make a configuration for SCREEN_1. As seen in Screen1, we have added one BlockSlot with slot number 1. In slots we add a field slot which has a number that matches the number given in the BlockSlot. At the AllowedBlocks field we tell what type of content this BlockSlot can contain.
For the Screen2, which has 2 BlockSlots, we add another slot configuration:
    - screen: SCREEN_2
      title: Screen 2
      description: This is screen 2
      order: 0
      settings:
        - key: TITLE
          title: Page title
          description: Title of the screen
          defaultValue: New screen
          fieldType: text
          required: true
      slots:
        - slot: 0
          title: BlockSlot
          defaultBlock: IMAGE
          allowedBlocks:
            - TEXT
            - IMAGE
            - MAP
        - slot: 1
          title: BlockSlot
          defaultBlock: IMAGE
          allowedBlocks:
            - TEXT
            - IMAGE
            - MAP
In the end, your manifest will look like this:
version: "1.0"
app:
  id: <app id>
  title: Tutorial app
  description: This is a tutorial app
  author: Tutorial
  version: 1.0.0
  main: ./dist/index.html
  branding:
    main: ./less/main.less
    themes:
      - themeId: <theme id>
        title: Default
        default: true
   screens:
    - screen: SCREEN_1
      title: Screen 1
      description: This is screen 1
      order: 0
      settings:
        - key: TITLE
          title: Page title
          description: Title of the screen
          defaultValue: New screen
          fieldType: text
          required: true
      slots:
        - slot: 0
          title: BlockSlot
          defaultBlock: IMAGE
          allowedBlocks:
            - TEXT
            - IMAGE
    - screen: SCREEN_2
      title: Screen 2
      description: This is screen 2
      order: 0
      settings:
        - key: TITLE
          title: Page title
          description: Title of the screen
          defaultValue: New screen
          fieldType: text
          required: true
      slots:
        - slot: 0
          title: BlockSlot
          defaultBlock: IMAGE
          allowedBlocks:
            - TEXT
            - IMAGE
            - MAP
        - slot: 1
          title: BlockSlot
          defaultBlock: IMAGE
          allowedBlocks:
            - TEXT
            - IMAGE
            - MAP
    - screen: SCREEN_3
      title: Screen 3
      description: This is screen 3
      order: 0
      settings:
        - key: TITLE
          title: Page title
          description: Title of the screen
          defaultValue: New screen
          fieldType: text
          required: true
      slots:
        - slot: 0
          title: BlockSlot
          defaultBlock: IMAGE
          allowedBlocks:
            - TEXT
            - IMAGE
        - slot: 1
          title: BlockSlot
          defaultBlock: IMAGE
          allowedBlocks:
            - TEXT
            - IMAGE
        - slot: 2
          title: BlockSlot
          defaultBlock: IMAGE
          allowedBlocks:
            - TEXT
            - IMAGE
After you have build your app, you can run the publish-script to publish your app to your GeoApps environment (If publishing takes a long time, you can empty your dist folder and do another build).
Configure your app
Now that we have published our app to our GeoApps environment, we can now add content to our screen.
Create a new app of the type we just published. Check this page on how to create a new app in GeoApps MapTour (geoapps.nl). Navigate to the Screens tab.
In this page we can configure our screens:
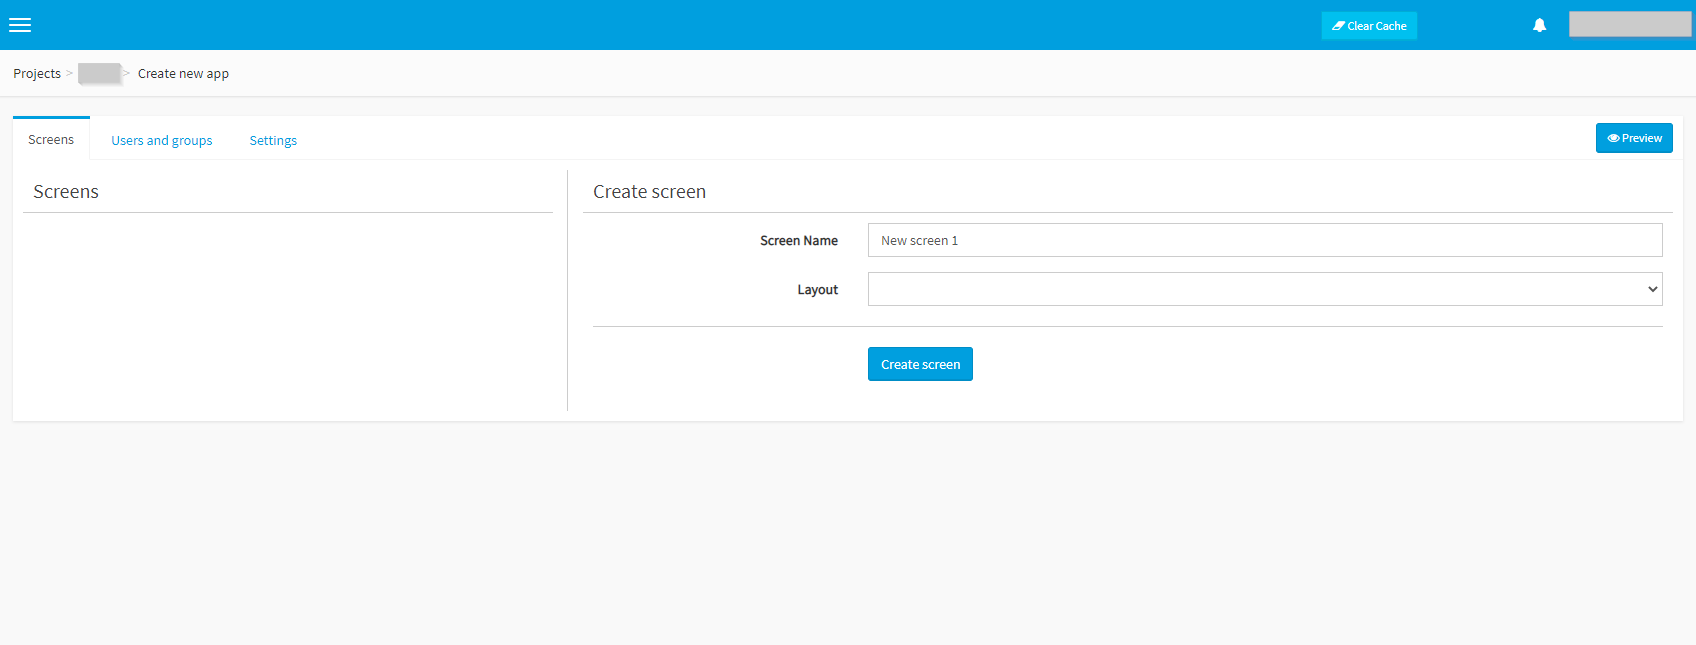
At Create screen chooce Layout Screen 1 (title of the screen given in the manifest).
For the BlockSlot type, choose Text:
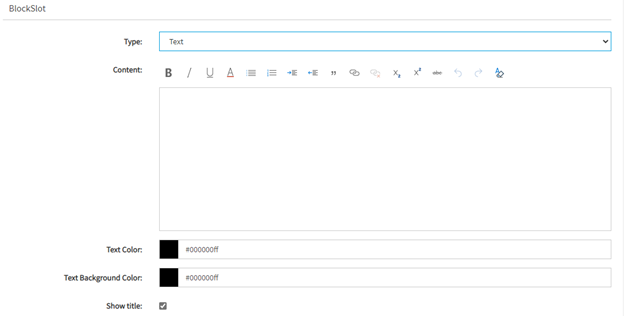
Add some text in the content pane. After you have pressed Update screen (saving the configured screen), you can preview the app by clicking Preview in the top right-hand corner of your screen.
Your app should now be visible in your browser:
![]()
Extra screens
We now want to add more screens to our app. We have added Screen 1, but we also want to add Screen 2 and Screen 3.
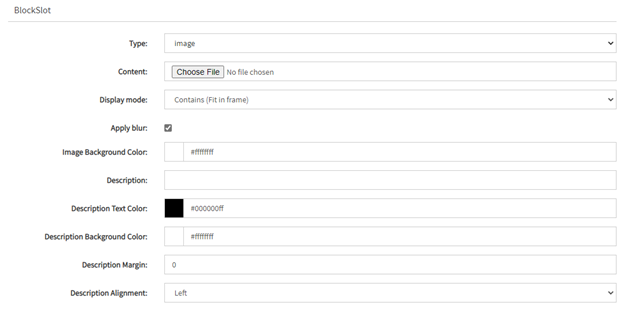
In the Screens tab click +Add. For layout, choose Screen 2 and click Create screen. In this screen we have added 2 blockslots, so we have 2 content placeholders to fill in. For the first slot, chooce image as type and click the Choose File button to choose an image:
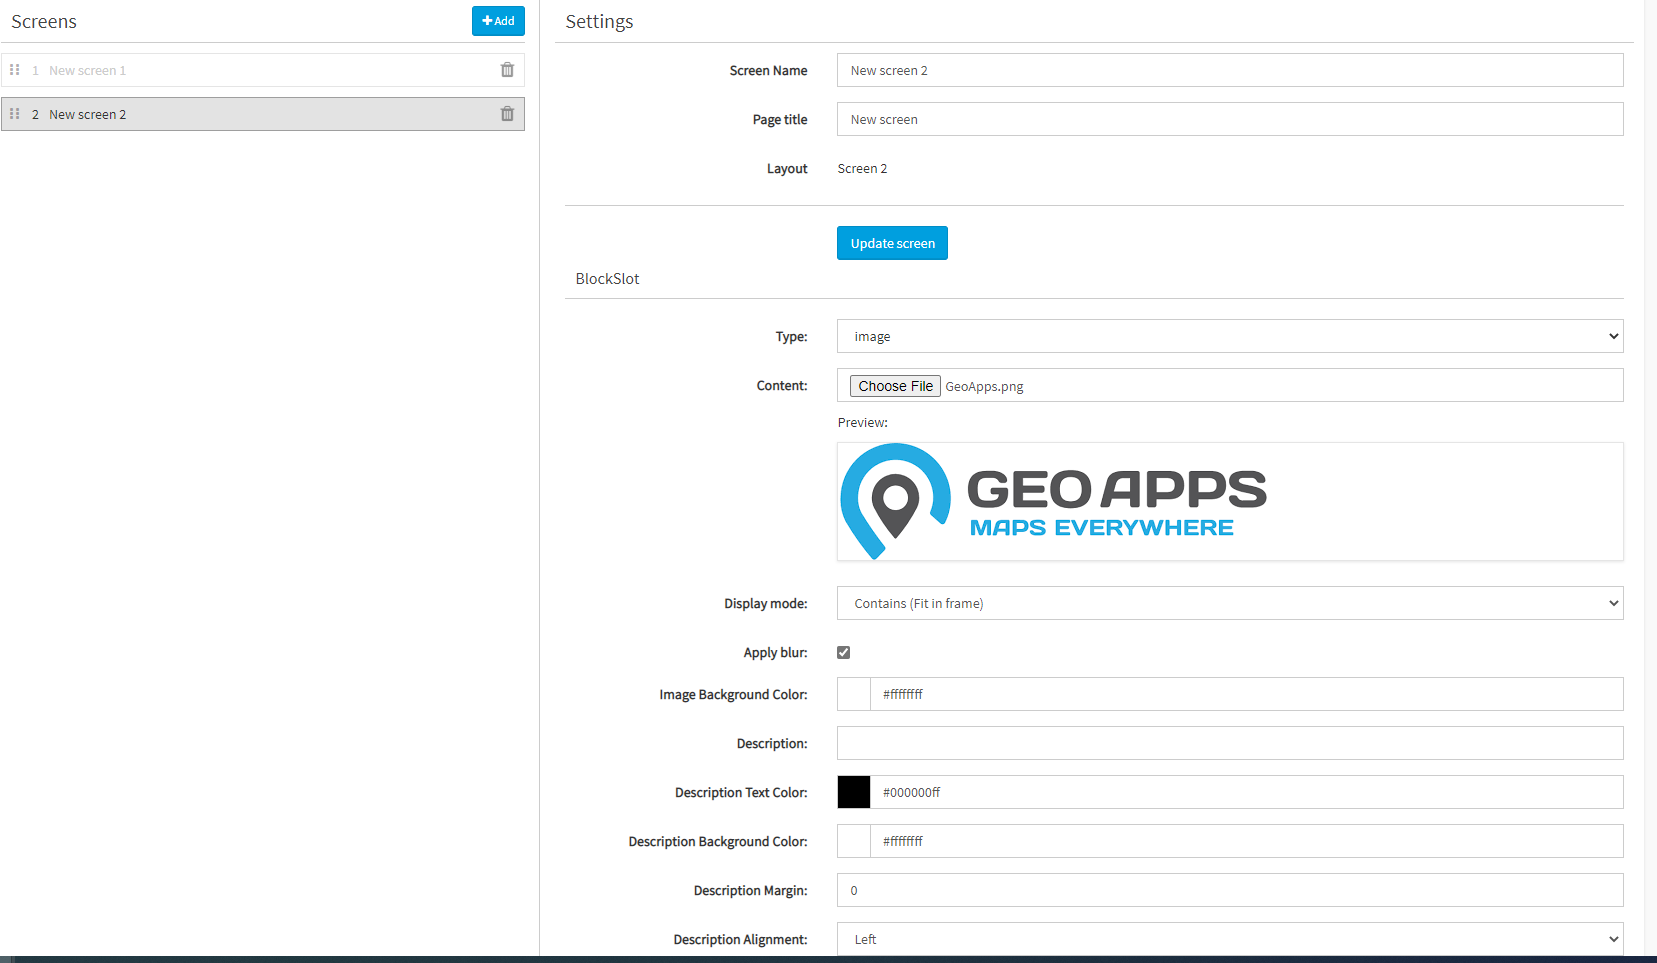
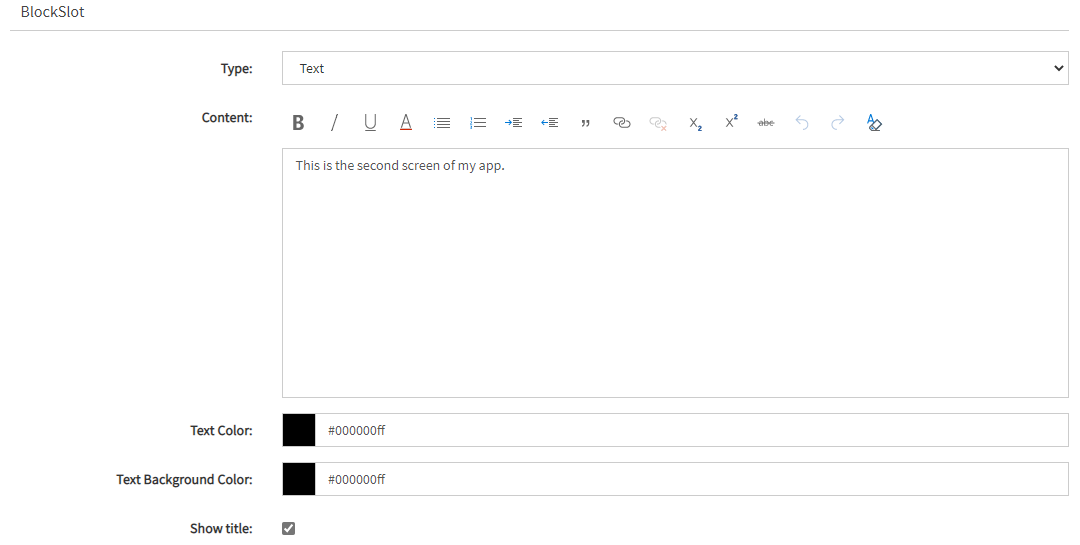
For the second slot, choose text as type. Add some text:
Maak nog een scherm aan, maar nu van het type image. Achter Content kiest u een afbeelding naar keuze.
Click Update screen to save the screen. Open the preview again. Your app now has two screens with the content you just added. With the Next and Previous buttons we can switch screens.
Now you can also add a third screen of the screen layout Screen3. You can add as much screens as you want, also of the same screen layout.
How does the screen load my configured content?
The settings you filled in are processed by the UI-Framework. The framework sees that you have chosen type of image or text and sees what content you have provided for the BlockSlot. The UI-Framework creates a bit of html that gets placed inside of the BlockSlot.
Debugging your app localy
You are able to debug the app localy (in your local development server with npm run server). Your geoapps.json file has a field called appId :
{
    "debug": {
        "tenant": "<your tenant>",
        "token": "<your token>",
        "appConfig": {
            "mode": "remote",
            "appId": "<your app id>"// <--- app id here
        },
        "browser": {
            "autoOpen": false
        }
    },
    "package": {
        "contentDirs": ["dist", "resources", "less"]
    }
}
We have to get the id of the app we had just configured and add it to appId in the geoapps.json. After we have added the app id, we need to closedown the server and restart it again. After we have reloaded our browser, we get the configured settings from geoapps.nl/manage in our local development server.
In this part of the tutorial we have seen how we can create a GeoApps app relatively simple using component of the UI-Framwork. We have added some basic styling which you can ofcourse change to your liking. You can also add more screens with different lay-outs and add more components from the UI-Framework.